Monday, January 30, 2017

Wood works

I'm posting this in stages. I'll have the case pics and other things as I get them done.

The wood works clock.
It's a very early one made by Chauncey Ives.  He was in business from 1818 - 1838 but during his last 8 years the had a partner, who is not acknowledged on the label in the clock so that would put this one pre 1830. If it turned out that it was early in his career, it could be 1820 which would make it almost 200 years old.   Making the gears out of wood was an inexpensive way for new clockmakers to establish businesses.
The only brass gear is the escape wheel that is visible in the video at the bottom.
The problem with these is that all the work is by hand.  The ultrasonic gets the day off.
Once apart every piece is checked and cleaned.  I use a very soft bristled brass brush which does a nice job. After a few hours, they were all clean and ready for a test run.  For this I only assembled the time train gears to see if this thing was even gonna work. Besides that, the striking gear trains are just nightmares to get together do to the syncing of the gears that is required.  I'll get into that later.


Check back in a day or 2 for more on this.

Now that at least I know that it works, it all comes apart to install and test the striking train.  These 2 wheels need to be installed in perfect orientation to each other so that as the last strike just finishes, one lever falls in the notched wheel and the other levers pin hits its stop.  If the mesh is off by a tooth or 2 the plates need to come back apart and rotate one or both wheels and try again.  I got it on my second try which is just a miracle.  I've had some in the past that have taken 10 tries.  Needless to say on these clocks words are used that you wouldn't want your kids to hear.

 All the gears in the clock and ready for the front plate.
All put back together and working beautifully.  I had previously made a suspension spring for the pendulum that worked, I've since found the original one and at almost 200 years old, this thing works nicer than a new clock. I just need to find the original pendulum now.
This clip has the clock running and striking.


Friday, January 27, 2017

Crystal regulator

I seem to remember after completing one of these years ago that I wouldn't do another.  While looking thru a storage trailer for something else a few days ago I spotted this in the corner and apparently forgot about my promise to myself. It was tarnished and beat up, but it was French, which were by far the best, and it was very old. The cobalt blue porcelain dial was also quite different.
The clock is stamped on the back plate by S. Marti who was an early maker of these and started in business in 1860.   It has an engraving on the front of the base with initials and a date. If only it could talk we could have a great history and who "CGR" was, and why the clock was presented.  Retirement or wedding gift maybe ?  These weren't cheap items back then so it was probably for someone well off. This one has a low serial number so it's likely an early one from the factory engraved at a later date.
Before
After


Here's the filthy thing as I found it.
 
The biggest problem restoring these is mainly just the amount of pieces in them.  It would be pretty nice if you could just clean them whole, but that's pretty much impossible.
This one had 24 pieces just in the case, and that's not including the screws.  There were 19 of them.  It also doesn't include the pendulum which had 16 pieces of its own.
Here are the pieces after disassembly. The box on the right is the pendulum without the vials.
 
Once taken apart, all the pieces need to be stripped of any remaining lacquer, dried, and it's off to the buffing machine.  It's messy and dirty work, not to mention time consuming. The buffing process seems to leave polish marks on the pieces.  I use to just run them thru the ultraxonic machine to reclean, but lately I have been hand polishing with simichrome.  It adds considerable time to the job but seems to make the pieces look a lot better. Up until now all the work can be done with bare hands. From now on gloves need to be worn. Touching any piece now would leave a fingerprint that would surely show up in the future.
The next step is removing the simichrome residue by wiping each piece with a clean rag saturated with acetone and then buffed with a clean dry rag so there are no streaks.
Here are most of the pieces after the polishing, but before the acetone and then spraying each piece with lacquer. 


Finished case


Even though the movement was working fine on the test wall, after sitting for so long, it really needed more than just an oiling.  Since there is no way to check or polish the pivots, or examine the mainsprings without pulling it apart, so it had to be done. The sealed vials in the pendulum are partially filled with mercury which is a little dirty, but they are probably the originals so I reused them.
here's what it looks like.

Pendulum vials


Counting all the pieces would have only added more time to the job so I didn't.
Here's a side and rear view of the movement back together and in the case.


The open escapement clocks have the escape wheel on the outside of the dial where it is visible. They seem to be the nicest to look at, especially the French clocks with the very delicate teeth on the wheels.  Here's a short video of how they work.
The completed clock is now in search of a home as well as the mineature in front of it.


Wednesday, January 18, 2017

Just a cutie.

Mineature carriage clock in it's original leather case pictured next to a full size carriage. I didn't measure but it's a little over 2-1/2 inches tall.
Made by the Waterbury Clock company, the patent dates on the back of the clock put it to the late 1800's.
It's just a cutie.


Monday, November 14, 2016

This is a gonna be a tough one.

The broken gathering pallet shaft.
I knew it going in because I've had them before,  Only 3 in over 25 years, but they were all brutal.  I'm sure other clocksmiths have their own "worst" jobs ever, but these are definitely one of mine.  If this wasn't a regular longtime customer, that has never complained about costs, I would have passed on this job in a heartbeat.
And just to put a little icing on this crap cake, the end of the shaft and the gathering pallet were missing completely.  We'll get into the gathering pallet later.
Somewhat of a rare clock movement, with a lot of quality in it, purchased at auction.  Looked like a simple clean and oil, couple of bushings, and out the door it goes. Then you pull the dial and see the gathering pallet.  Well actually you don't see it cause it's not there, but you see the problem.  It's also obvious that someone had tried a really desperate repair that turned out horribly, doing a lot more damage along the way.  Whoever put this into the auction knew it, but this isn't something you will say upfront, because then nobody would opt to buy it.

I don't even know the odds of it, but at the time the bad one came in, I just happened to have a identical twin, but the same maker, on my test stand. The repair was doable without it but at least I could see the shape and size of the original gathering pallet. Even more than that though was it made explaining to the client the severity of the problem with only a couple pics.

Missing shaft and pallet
This is what should be there
 The gathering pallet is probably the one part of any old clock that needs to be made by hand.  This is the piece that makes the clock count the number of times it strikes, and then it's the brake that stops everything.  They are cut and filed out of a solid block of steel, and are the oddest shape that one could even imagine. There are curves, flat spots circles and a square going thru the center to fit the pallet shaft. the tolerances and clearances also need to be very close.

Donor steel and finished pawl
The existing arbor now needed to be extended which is tough.  I elected to use a drill for the shaft because the size quality and hardness of the steel.  A butt joint would not have the necessary strength so I turned the end of the drill down and backdrilled the existing shaft for a press fit.  The joint was then brazed because solder would not be strong enough and then the excess braze turned down in the lathe to end up with a smoothe shaft.
Pieces before joining
Below is a pic of the repaired shaft set up in the jewelers lathe with a filing attachment so that the end can be filed to a perfect square. Prior to this step, and the backdrilling of the shaft, I needed to make a brass adaptor to hold the gear.  Since there was no option but to hold it by the pinion (small gear on end), these teeth needed to be protected.  Here is a pic of the piece.
Brass collet in steel collet

Setup for filing
 These 2 pics are the completed shaft and also the completed shaft in the clock.

Here is a short video clip of the finished part and how it functions.


I was happy to see this job completed and out of here.

Friday, October 21, 2016

Antique Cyclometer

Antique Cyclometer.

Yea, I never heard of one either but this one came in a month or so ago.  Over the years people have wandered into my store with all kinds of things, large and small.  Slot machines, scales, model trains, etc.  I think they spot all of the little tools and figure that you can fix about anything.
This one was a little different because it was a longtime friend that brought it over.  The cyclometer mounts on the frame of a penny-farthing or hi-wheel bicycle.  The cross shaped piece on the top straddles the spokes and as the wheel rotates, each spoke advances the counter.  As a big collector of the bicycles, owning many of them, he only had one of the cyclometers until he recently bought this one. When he got it it he saw that it was missing a lot of pieces.  It's a good thing he already had one that I could use as a model and see what the missing parts looked like, because there doesn't seem to be anything online about these things.
This is the original unit.


The main shaft which has a worm gear on one end and a cross shaped piece on the top were missing.  The glass lens was also broken. I don't have any pics of that part of the repair but the glass was replaced with a nice fitting pocketwatch crystal which is held in by a soldered retaining ring and plaster. I wish I took more pics.
Here are some views of the replacement shaft that was handmade.
The completed shaft and top cross completed.
I was not able to determine for certain the material the original cross was, but I made mine out of brass.  I had a plate of some pretty thick and hard stuff.  This was a tough one because it had to be cut by hand with a jewelers saw and then filed.  Once I was happy with the shape I silvered it.  The original one was plated.


Assembled cyclometer on right.  Owner just needs to "age" the silvering on the cross.


Friday, May 27, 2016

Anniversary Clock Restoration

Anniversary Clock Restoration

After sitting on a shelf in the shop for about 10 years, it was time to do something with this.  The newspaper that the pendulum is wrapped in, which is sitting in the clock pillars had a 2006 date on it which is how I came up with the 10 years.
Although the typical anniversary clock will run for a year between windings, this clock only runs a month. Since it is a torsion spring clock it is still put in the same category.
This clock is pre WW 1 dating to 1910.  Being over 100 it was pretty tarnished and something had to be done.  Being the purist that I am, I'm all for leaving things original but when they look like this, you just don't even want to look at them.  It's like having that rare 65 mustang sitting all rusty in a field and thinking you will ruin it's value if you restore it.  Well you won't. If the original maker of the clock were alive today, he would be the first to say clean me up. At least I did all of the cleaning and polishing by hand which makes me feel like less of a sinner.

Here is the clock prior to doing anything to it.


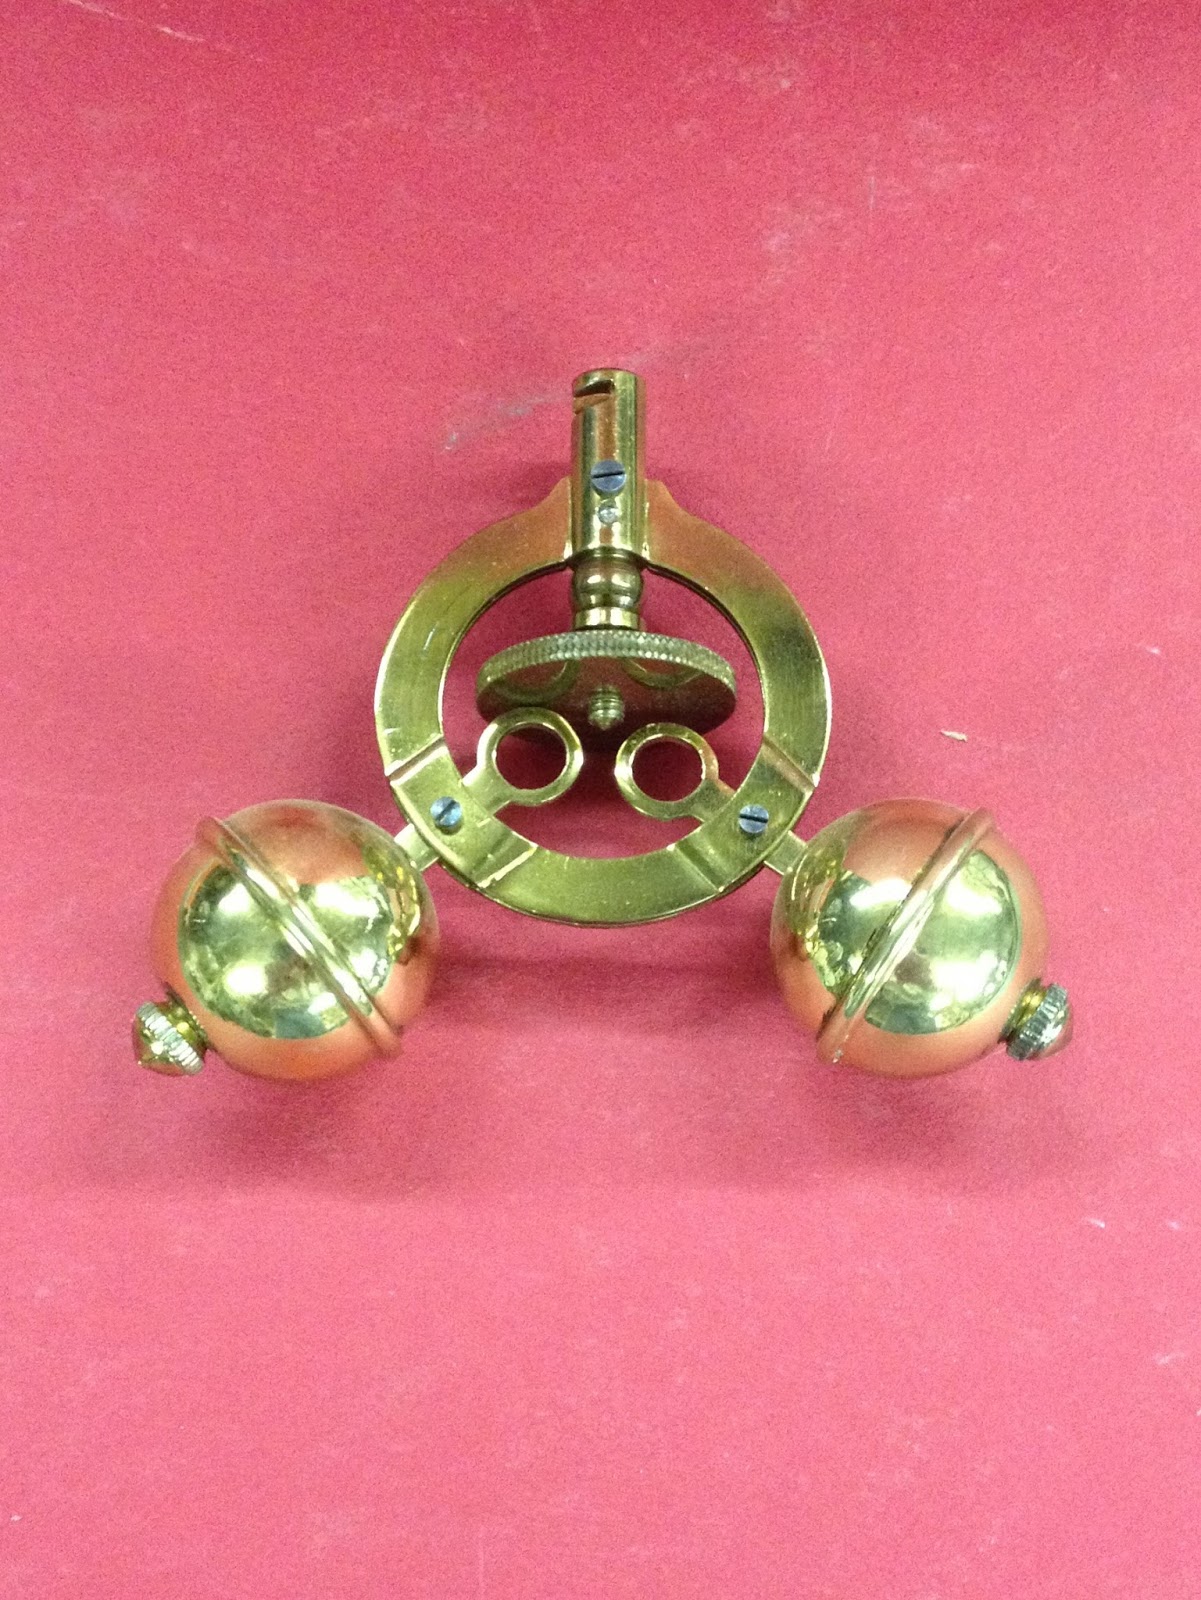
I was surprised to see how clean the pendulum stayed being wrapped in the newspaper all this time.  One thing making this unique is that there are only 2 balls instead of the 4 that are on 99 percent of these things unless they are much older and they used disks.


Here is a shot of the top piece that holds the movement from above and below.  You can see the nice finish on the part that has been shielded where it was screwed together.


The clock movement itself is held into the top with three screws that were pretty rusty.  The heads on 2 of them also butchered up by a previous repaired that didn't know how to take care of his screwdrivers.  They could probably have just been cleaned up with a scratch brush and oiled or painted, but I though bluing would be the first class way to go. The bluing will protect the screw and is quite attractive to look at.  If you have an old pocketwatch, go look at the hands up close and they are probably blued.  The bluing is done by getting the screw as polished as you can, and then as clean as you can, all without touching it with your fingers, and then heating it on a brass plate to a specific temperature carefully watching it as it changes color. As soon as it turns blue/purple it is quickly dumped in water to cool and instantly stop the color change If you heat a second or 2 too long or don't quench fast enough the blue turns to grey and you have to start over from the beginning.

This picture shows the 3 screws in the different stages. The right is the original rusty one, the cemter is after cleaning and polishing, and the left is after the bluing.  This is actually pretty crude by watch standards but is okay for this clock.  100 years ago the watchmakers had a dedicated tool just for polishing screwheads prior to bluing.


Another pic


The screw in the clock.


Friday, May 29, 2015

Bushings

Although the "punchers" obviously feel as though bushings are a waste of money and don't buy them, they are the proper way to repair worn pivot holes.  They are not hard or even time consuming to install, but unfortunately the plates need to come apart and this does take extra time.
Depending on the clock you are working on determines the quality of the bushing job you do.  Early American clocks were mostly thin stamped brass plates with the pivot holes stamped to almost look like a bushing.  This probably hardened the brass a little more, provided an oil sink,  and gave the pivot hole a little extra life.

 For a clock like this, the hole can be opened up with a special reamer which only cuts on one side until the hole is brought back to center.  Then a bushing of the proper height to match the plate, is pressed into the opening.  It is then opened up a bit with a broach so it's just slightly larger than the pivot.  Too tight and the gear will bind up.

It's important to match the thicknesss of the plate.  Some repairers sometimes leave the bushings too long thinking the added surface will take longer to wear out, but it's not the case.  A long bushing like this pic causes tunneling, which is wear, but not all the way to the end cause it can't reach, but after it tunnels it reduces the end play of the gear which is no good.
Whether you buy your bushings or make them, when they are too tall there are tools (I made mine) that can cut the bushing down to the correct height and leave an oil sink.

On the eveyday, plain vanilla, American clock movement, a visible bushing isn't an issue.  Same for a modern cuckoo clock. ( I know,  you're probably wondering why anybody would even waste a bushing on a cuckoo, but sometimes you have to.)  On finer French clocks, which rarely need bushings anyway, or significant tall case or banjos,  you might want to make the bushings as invisible as possible.  This can also be done with special cutters.